Unlike replacing an entire roof, roof repair focuses on a smaller section of the structure. This can include patching holes and small gaps or replacing damaged shingles or materials.
A thorough inspection is a critical first step. Check with your homeowners insurance as well, they can cover storm damage. Visit Website to learn more.
Your roof is subject to a lot of damage throughout the year. Sudden and severe storms, cool weather, and the natural aging of asphalt materials can all take their toll on your shingles. The result is a leaky roof, sagging shingles, or even missing shingles. Fortunately, the vast majority of shingle damage can be repaired with relative ease. First, assess the damage. If you notice that a single shingle is curling up at the edges, lifting, or has a cracked surface, it’s time to get on your roof and repair the problem before it snowballs into a bigger issue.
If your shingle is simply loose, you can use a tar sealant to temporarily hold it in place for another season or two. But this isn’t a permanent fix and the shingle will likely have to be replaced sooner rather than later.
Using a catspaw pry bar, carefully peel back the layer of shingles directly above the damaged one to break the sealer strip connection and expose the nails holding it in place. Next, use a carpenter’s square to draw a vertical line across the damaged shingle and cut along it with your utility knife. Then, remove the torn section of the shingle and replace it with a fresh new one.
If the shingle is cracked, you can also use a tar sealant to temporarily repair it until you can replace it later. Again, this isn’t a permanent solution and the shingle will probably need to be replaced sooner than you would have preferred.
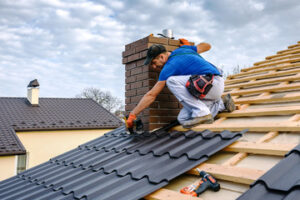
Replacing a shingle isn’t rocket science, but it requires a good amount of care and attention. Ideally, you should consult with a roofing professional to learn the best ways to identify and repair damaged shingles. If you do opt to go it alone, start by gathering the necessary materials. You’ll need a flat pry bar, a hammer, a utility knife and a few handfuls of 1-1/4-inch roofing nails. Once you’ve got the tools, locate a few replacement shingles that closely match up in color and size with the ones on your roof and head to your local home improvement center to purchase them.
Damaged Flashing
A roof’s flashing is one of the most important components in protecting your home from water damage. The metal strips can be found at all the seams and edges of your roof, especially near chimneys, vents, skylights, and other penetrations. Flashing is used to direct rainwater away from these areas, so any holes or breaks in the flashing could allow moisture into your house.
The most common flashing damage is caused by the freeze-thaw cycle that occurs every winter. When temperatures drop and the water surrounding your flashing freezes, it expands, which can eventually rip through the flashing and expose the interior of your roof to moisture. Eventually, this can lead to severe structural damage and even mold.
Another common cause of flashing damage is corrosion. The constant exposure to weather elements causes the metal flashing to rust, leading to small holes. This can occur over time, or it may happen after a major storm, such as hail or heavy wind.
Luckily, roof flashing is relatively easy to repair. A roofing contractor can remove the damaged shingles, expose the flashing and replace it. They can also apply a sealant to prevent further water leaks and protect the surrounding shingles.
If your flashing is damaged, it’s crucial that you get it repaired right away. Even small leaks can lead to serious damage over time, including rotted framing and sheathing, destroyed insulation, and stained ceilings.
Damaged Substrate
A building’s substrate is the structural component that supports the roofing membrane and other roof components. If the substrate becomes compromised, leaking can occur, and the integrity of the building could be jeopardized. Damaged substrate is often a result of poor installation or water intrusion. A thorough inspection by a roofing contractor can identify and resolve substrate problems before they become major leaks or safety hazards.
Examine the roof for damaged substrate, examining areas like sags in roof edges and flashing around vents. Also check the base of roof vents for leakage. If the substrate is compromised, the roof will need to be replaced.
Blistering of a roofing material occurs when water gets trapped between layers and causes the surface to swell. It’s most common in older shingles, but can occur in roll roofing as well. If the blister contains water, soak it up with a rag and allow it to dry completely before patching the area. If the blister is just a surface discoloration, it may not need to be repaired.
In cases where the damage to the substrate is more severe, it can be patched using a fluid coating. A fluid coating is designed to cling to the surface of the substrate and provide long-term waterproofing, reducing moisture and condensation that can cause other problems on the roof.
If a membrane roof is compromised, it will need to be replaced. Membrane roofs are not typically as flexible as shingle systems, so it’s important to replace them with the same type of membrane used in the original installation. Moisture scans and core cuts should be performed to determine the condition of the substrate and insulation, and they should be repaired as per NRCA guidelines.
If you need to replace the substrate, remove all sagging and delaminated areas of the roofing material. Remove all screws and nails that secure the existing substrate to the joists, then snap a chalk line across rafters on both sides of the damaged section. This will help you locate the center of the joists and ensure the replacement piece is centered on them. Cut a patch of tar paper or rubber roll roofing 12 in (30 cm) wider and longer than the repair area, apply a liberal coat of cement, and set it in place over the mend. Nail it down with galvanized roofing nails, spacing them at 3 in (7.6 cm) intervals.
Missing Shingles
It’s not always easy to spot a missing shingle, especially since many people don’t go up on their roof to survey it regularly. But if you look closely enough, there should be clues: those middle-of-the-night drips or the dark ceiling stain that appears one stormy afternoon.
If you do happen to spot a missing shingle, it’s important to take quick action. Left unattended, it could lead to a leak in your home’s ceiling or walls. The dampness that results can quickly damage insulation, floorboards and even the structure of your house itself.
Before you start replacing the shingles, first check to see how big a hole is. If it’s a small area, you may be able to handle the repair yourself. If it’s a bigger gap, you will need to call in a professional.
You’ll also need to make sure you have a set of replacement shingles on hand, which can be purchased at any home improvement store. Once you have them, you can start by removing the damaged shingle with a pry bar and removing any nails that are still holding it in place. This will ensure that the new shingle doesn’t puncture or damage the existing shingles.
Next, slide the new shingle into place. It’s typically easier to use a single row of shingles rather than trying to replace just one at a time. Using this method will help ensure that the shingles are layered properly, so they won’t come loose over time. Make sure you nail the shingle down through its nail strip and not the adjacent shingle underneath, as this can puncture the new shingle and cause leaks in the future.
While this fix is relatively easy, you should never attempt to work on a roof yourself without proper training and the right safety equipment. A professional roofer can quickly assess and treat any issues with your roof to keep it in good condition. And they can help you identify problems before they cause major problems, so your home can continue to provide a safe, warm and comfortable space for you and your family.